Setting up Suricata on the Raspberry Pi
Wanna just skip to the steps? Here You Go
A few months ago, I attended a training session where it was recommended to run Snort to monitor a compromised (or possibly compromised) machine. The trainer had used Snort in WSL on a laptop. WSL is fine and all but I would not want to leave a laptop overnight that I probably depend on.
So I though, well, Raspberry Pi’s are cheap, run Linux, and throw in a smart switch where I can mirror the ports, problem solve.
I have a couple Raspberry Pi 3b’s sitting around doing nothing. I was able to pick up a TP-Link TL-SG105E to do port forwarding between my cable modem and my Internet of Thing’s Network to complete the kit.
So if I was to do this with a client, my kit would be:
- A Raspberry Pi
- The Switch
Now, you might be thinking, the title says Suricata, not Snort. Well, when I started testing this, I was using Kali Linux on the Raspberry Pi. For whatever reason, Snort was not in the repository. Fortunately, I had watched an interesting training video on an application called Suricata.
Suricata is compatible and comparable to Snort. Also it has an advantage over Snort in that it will use all the cores of a multi-core processor. With a Raspberry Pi 3b being kinda starved for resources, I consider being able to spread the load across multiple an advantage.
With that said, how did I get it going?
First thing I did was prepare the operating system for the Raspberry Pi. I went though a few, starting with Kali, then Ubuntu Server, and finally ending up back at Raspberry Pi OS. Honestly, Raspberry Pi OS on a Raspberry Pi has always just felt right. Sure I could get other operating systems going but having access to raspi-config to tweak the hardware without manually doing it is nice. Also with the Minimal install, I get a nice small install with no bloat, so the only thing on here is Suricata. As part of my setup using the official Imager Program, I setup SSH, my hostname, and passwords. I have the wireless being used to access the Rpi3B with the Ethernet for monitoring only.
After the install, it was time to update the opearting system, a few reboots later and we are ready to setup and configure Suricata.
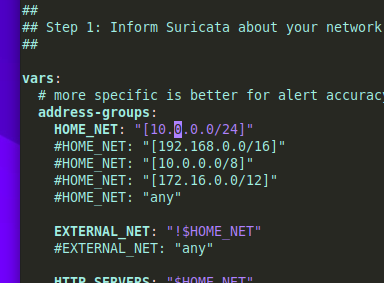
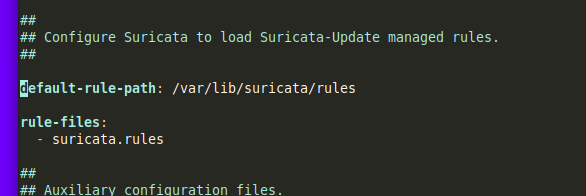
Suricata saves its config in /etc/suricata/suricata.yaml. I have no opinion on Yaml files vs other configs, they are easy to ready and they get the job done. I had two changes to make.
First, I set HOME_NET to the IP to the IP of my network stack.

Next, in the file, I set the location of my rules. I set the rules to go to /var/lib/suricata/rules

Now I save the file and its time to get things rolling.
I next run a few commands, first I put the ethernet card into promiscuous mode just to get it to see everything. Mind you, before doing this, I did configure my switch with port mirroring.
sudo ip link set eth0 promisc on
Next we enable and start Suricata with sudo systemctl enable suricata.service followed by sudo systemctl start suricata.service
Now we download the rules by running sudo suricata-update. Since I am on a Raspberry Pi 3b with 1gig of ram, this may take a few minutes.
Now here is a tricky part. This part threw me off for a minute, but you need to run sudo chmod -R 755 /var/lib/suricata/rules or Suricata will start and say its running, but load no rules. After this, run sudo systemctl restart suricata.service. I give it a minute and then I will check /var/log/suricata/suricata.log for a SC_ERR_NO_RULES(42) error. If I see that, I rerun the chmod to reset the permissions and restart the service and check again.
You have to give Suricata a couple minutes to get going. From another computer, I run curl http://testmynids.org/uid/index.html. This will generate traffic into the logs. Though if you give it a minute and watch, you will be amazed how often Google devices reach out.

It has been interesting leaving it on for the last day or so. I definatly have to get in there and fine tune it. It was a good proof of concept project and if I ever need a small portable IDS, I’ve got one.
Something I found I like to run tail -f /var/log/suricata/fast.log and keep it up in a terminal so I can watch trafic as it is flagged.
Another fun thing I did do with this was load Ettercap on here. It is a good and quick way to do packet capture into a pcap file and then load into Suricata or Wireshark for analysis later. But that will be a project for another day.
The steps I took to do this can be easily found in my GitHub
Until then, take care and 73’s everyone.
